以按键精灵为灵感,写了一个带 GUI 的鼠标宏。第三方库用到了 Pillow 和 pyautogui,分别提供了获取鼠标位置 RGB 颜色和模拟键鼠操作功能。GUI 当前通过 Python 内置的 tkinter 库实现,后续可能会用别的(可以支持拖动控件的)。

添加判断功能暂未写好,后续会在本文更新。
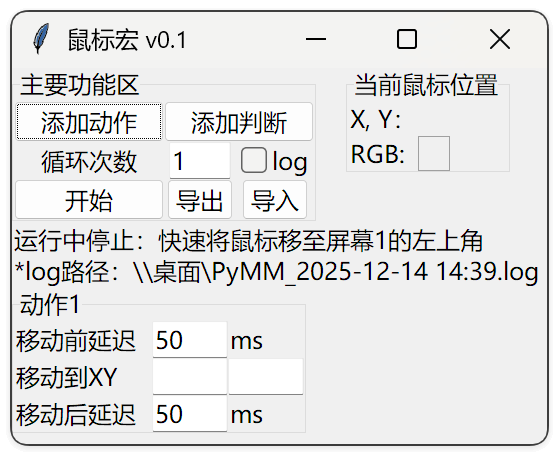
主要功能

代码实现

主界面

1
2
3
4
5
6
7
8
9
10
11
12
13
14
15
16
17
18
19
20
21
22
23
24
25
26
27
28
29
30
31
32
33
34
35
36
37
38
39
40
41
42
import pyautogui
from PIL import ImageGrab
import datetime
import tkinter.ttk
from tkinter import messagebox
import tkinter.filedialog as filedialog
import ctypes
import pathlib
import re

# 现在时间
def now():
return datetime.datetime.now().strftime('%Y-%m-%d %H:%M:%S.%f')[:-3]

# GUI
root = tkinter.Tk()
# 调用api设置成由应用程序缩放
ctypes.windll.shcore.SetProcessDpiAwareness(1)
# 调用api获得当前的缩放因子
ScaleFactor = ctypes.windll.shcore.GetScaleFactorForDevice(0)
# 设置缩放因子
root.tk.call("tk", "scaling", ScaleFactor / 75)
# 窗体置顶
root.attributes("-topmost", True)
root.title("鼠标宏 v0.1")
k = ScaleFactor / 100
w, h = int(267.5 * k), int(115 * k)
root.geometry(f"{w}x{h}")
root.minsize(w, h)

# 功能区
mainland = tkinter.ttk.LabelFrame(root, text="主要功能区", height=100, width=200)
mainland.grid(column=0, row=0, sticky=tkinter.W)

readme = tkinter.ttk.Label(root,text=f"运行中停止:快速将鼠标移至屏幕1的左上角\n*log路径:\\\\桌面\\PyMM_{now()}.log")
readme.grid(column=0, row=1, columnspan=2, sticky=tkinter.W)

# 鼠标位置
mouse = tkinter.ttk.LabelFrame(root, text="当前鼠标位置", height=100, width=300)
mouse.grid(column=1, row=0, sticky=tkinter.NW)

root.mainloop()

添加动作

点击后在下方出现 Frame,内含动作前后延迟和动作目标位置。

动作类

1
2
3
4
5
6
7
8
9
10
11
12
13
14
15
16
17
18
19
20
21
22
23
24
25
26
27
# 动作类
class Action:
def __init__(self, frame):
self.frame = frame
self.name = self.frame.cget("text")
self.no = self.name[2:]
self._bind_entries()

def _bind_entries(self):
# 收集frame下所有entry 按grid排序
entries = []
for w in self.frame.winfo_children():
if isinstance(w, (tkinter.ttk.Entry, tkinter.ttk.Entry)):
info = w.grid_info()
entries.append((info["row"], info["column"], w))

entries.sort(key=lambda x: (x[0], x[1]))
entries = [w for _, _, w in entries]

self.move_before = entries[0].get()
self.x_move = entries[1].get()
self.y_move = entries[2].get()
self.move_after = entries[3].get()

# 统一获取
def __repr__(self):
return f"N{self.no} B{self.move_before} X{self.x_move} Y{self.y_move} A{self.move_after}"
1
2
3
4
5
6
7
8
9
10
11
12
13
14
15
16
17
18
19
20
21
22
23
24
25
26
27
28
29
30
31
32
33
34
35
36
37
38
39
40
41
42
43
44
next_row = 1
def add_act():
global next_row

frame_act = tkinter.ttk.LabelFrame(root, text=f"动作{next_row}", height=240, width=300)

frame_act.grid(column=(next_row - 1) // 8,row=(next_row - 1) % 8 + 2,columnspan=1,sticky=tkinter.W)

# 用于记录该Frame内的所有Entry
frame_act.entries = []

def add_entry(parent, row, col, default=""):
e = tkinter.ttk.Entry(parent,width=5,validate="key",validatecommand=(root.register(lambda x: x.isdigit() or x == "" or x.count(".") == 1),"%P",))
# 激活鼠标位置
e.bind("<FocusIn>", on_focus_in)
e.bind("<FocusOut>", on_focus_out)
e.grid(column=col, row=row)
if default:
e.insert(0, default)
parent.entries.append(e) # 自动登记
return e

# 移动前延迟
tkinter.ttk.Label(frame_act, text="移动前延迟 ").grid(column=0, row=0, sticky=tkinter.W)
add_entry(frame_act, 0, 1, default="50")
tkinter.ttk.Label(frame_act, text="ms").grid(column=2, row=0, sticky=tkinter.W)

# 移动到XY
tkinter.ttk.Label(frame_act, text="移动到XY ").grid(column=0, row=1, sticky=tkinter.W)
add_entry(frame_act, 1, 1)
add_entry(frame_act, 1, 2)

# 移动后延迟
tkinter.ttk.Label(frame_act, text="移动后延迟 ").grid(column=0, row=2, sticky=tkinter.W)
add_entry(frame_act, 2, 1, default="50")
tkinter.ttk.Label(frame_act, text="ms").grid(column=2, row=2, sticky=tkinter.W)

root.minsize(int(w + next_row // 8 * 35 * k), min(int(h + next_row * 73 * k), int(699 * k)))
root.update()
next_row += 1

button0 = tkinter.ttk.Button(mainland, text="添加动作", width=10, command=add_act)
button0.grid(column=0, row=0)

添加判断

这个还没写。

循环次数

变量实为右侧的 Entry。

1
2
3
4
tkinter.ttk.Label(mainland, text="循环次数").grid(column=0, row=1)
loop = tkinter.ttk.Entry(mainland,width=4,validate="key",validatecommand=(root.register(lambda x: x.isdigit() or x == "" or x.count(".") == 1),"%P",))
loop.insert(0, 1)
loop.grid(column=1, row=1)

log

勾选后点击开始会输出日志。

1
2
3
4
5
desktop_path = pathlib.Path.home() / "Desktop"
log_path = "\\PyMM_{}.log".format(datetime.datetime.now().strftime('%y%m%d_%H%M%S'))
log = tkinter.BooleanVar()
tkinter.ttk.Checkbutton(mainland, text="log", variable=log).grid(column=2, row=1)
log_path = str(desktop_path) + log_path

开始

遍历所有的 Frame,获取输入的值,并依次执行。

1
2
3
4
5
6
7
8
9
10
11
12
13
14
15
16
17
18
19
20
21
22
23
24
25
26
27
28
29
30
31
32
33
34
35
36
37
38
39
40
41
42
43
44
45
46
47
48
def run():
loops = int(loop.get())
data = get_all(root)
tmp = f"循环次数:{loops} 启用log:{log.get()}\n" + str(data)
print(tmp)
# 安全模式:当鼠标移动到屏幕左上角时自动中止程序
pyautogui.FAILSAFE = True
# 所有PyAutoGUI函数之间的默认暂停时间(秒)
pyautogui.PAUSE = 0.005 # 可调整以模拟不同的操作速度
# 自动中止的安全区域坐标点
pyautogui.FAILSAFE_POINTS = [(0, 0), (1, 0), (0, 1), (1, 1)] # 默认值

root.iconify()
for i in range(loops):
# n = min(data.keys())
# act = data[n]
break_flag = False
for act in data.values():
try:
pyautogui.click(
x=act.x_move, # X坐标
y=act.y_move, # Y坐标
clicks=1, # 点击次数
interval=0.0, # 多次点击之间的间隔时间
button='left',# 使用的鼠标按键:'left'、'middle'、'right'
duration=act.move_before, # 移动鼠标到点击位置的时间
tween=pyautogui.linear # 移动轨迹函数
)
pyautogui.PAUSE = int(act.move_after) / 1000
print(f"{now('%Y-%m-%d %H:%M:%S.%f')}:循环{i+1}/{loops} {act.name}执行成功")
except Exception as e:
root.deiconify()
root.attributes("-topmost", True)
messagebox.showerror(f"{act.name}报错", f"{e}")
break_flag = True
break
finally:
if log.get():
with open(log_path, mode="a+", encoding='utf8') as f:
f.write(f"{now()}:循环{i+1}/{loops} {act} 完成\n")
if break_flag:
break
root.deiconify()
root.attributes("-topmost", True)

button2 = tkinter.ttk.Button(mainland, text="开始", width=10, command=run)
button2.grid(column=0, row=2)

导出

同开始,但不执行,而是输出文件。

1
2
3
4
5
6
7
8
9
10
11
12
13
14
15
16
17
18
19
20
21
22
23
24
25
def saveas():
data = get_all(root)
print(data)
files = [("文本文档", "*.txt"), ("所有文件", "*.*")]
filepath = filedialog.asksaveasfilename(
title="导出文件", filetypes=files, defaultextension=files
)
if filepath:
content=""
for act in data.values():
try:
n = int(act.no)
x = int(act.x_move)
y = int(act.y_move)
b = int(act.move_before)
a = int(act.move_after)
s = act.name
content = content + f"N{n} X{x} Y{y} B{b} A{a} #{s} \n"
except Exception as e:
root.deiconify()
root.attributes("-topmost", True)
messagebox.showerror(f"{act.name}报错", f"{e}")
with open(filepath, "w", encoding='utf8') as f:
f.write(content)
print(f"文件已保存到{filepath}")

导入

删除所有动作 Frame,并按序写入。

1
2
3
4
5
6
7
8
9
10
11
12
13
14
15
16
17
18
19
20
21
22
23
24
25
26
27
28
29
30
31
32
33
34
35
36
def load():
filepath = filedialog.askopenfile(
title="导入文件",
filetypes=[("文本文档", "*.txt"), ("所有文件", "*.*")],
)
if filepath:
with open(filepath.name, "r") as f:
data = f.readlines()
else:
print("导入取消")
return

# 清空所有动作
global next_row
next_row = 1
for frame in root.winfo_children():
if isinstance(frame, tkinter.ttk.LabelFrame):
if frame.cget("text").startswith("动作"):
frame.destroy()

for i in data:
add_act()
# 匹配字母+数字
matches = re.findall(r'([A-Z])(\d+)', i.upper())
# 转成字典,数字转成int
tmp = {k: int(v) for k, v in matches}
# 最新的Frame
latest_act = root.winfo_children()[-1]
print(tmp,latest_act.winfo_children())
latest_act.config(text= "动作" + str(tmp["N"]))
latest_act.winfo_children()[1].delete(0, 'end')
latest_act.winfo_children()[1].insert(0, tmp["B"])
latest_act.winfo_children()[4].insert(0, tmp["X"])
latest_act.winfo_children()[5].insert(0, tmp["Y"])
latest_act.winfo_children()[7].delete(0, 'end')
latest_act.winfo_children()[7].insert(0, tmp["A"])

鼠标位置

鼠标焦点在动作 Frame 输入框时触发,不然会比较卡。

1
2
3
4
5
6
7
8
9
10
11
12
13
14
15
16
17
18
19
20
21
22
23
24
25
26
27
28
# 获取全局鼠标位置(支持多显示器)
def get_mouse_pos():
pt = ctypes.wintypes.POINT()
ctypes.windll.user32.GetCursorPos(ctypes.byref(pt))
return pt.x, pt.y

# 获取全屏截图尺寸(多显示器)
def get_screen_bbox():
user32 = ctypes.windll.user32
user32.SetProcessDPIAware()
global max_x, max_y
# 78/79为虚拟屏总宽高
max_x = user32.GetSystemMetrics(78)
max_y = user32.GetSystemMetrics(79)
return (0, 0, max_x, max_y)

screen_bbox = get_screen_bbox()

tkinter.ttk.Label(mouse, text="X, Y:").grid(column=0, row=0, sticky=tkinter.W)
label_pos = tkinter.ttk.Label(mouse)
label_pos.grid(column=1, row=0, columnspan=2, sticky=tkinter.W)
style = tkinter.ttk.Style()
style.configure("Color.TLabel")
tkinter.ttk.Label(mouse, text="RGB: ").grid(column=0, row=1, sticky=tkinter.W)
label_color = tkinter.ttk.Label(mouse, text=" ", relief="solid")
label_color.grid(column=1, row=1, sticky=tkinter.W)
label_rgb = tkinter.ttk.Label(mouse)
label_rgb.grid(column=2, row=1, sticky=tkinter.W)

宏的语法

如下例,中间用字母隔开,注意所有数字均为整型,字母顺序无所谓。

  • N:动作序号(No),执行时会按这个顺序。
  • X:鼠标 X 位置,以屏幕 1 左上角为原点 0
  • Y:鼠标 Y 位置,以屏幕 1 左上角为原点 0
  • B:移动前延迟(before),单位 ms。
  • A:移动后延迟(after),单位 ms。
  • #:注释,语法分析时会忽略#至空格(换行符)的内容。

后续更新

  1. 添加判断功能,比如鼠标目标位置颜色。
  2. 动作 / 判断位置改为始终置顶且可拖动的窗体,而不是手动输入坐标。
  3. 动作加上鼠标右键、中键和键盘等操作。
  4. 动作 / 判断顺序可调整(这个或许需要整体重构,会另外更新)。

成品获取

下载请见 Malvern's File Server


网站地图 | 状态监测 | 皮带张力测试 | File Server | 博友圈 | 博客说
Copyright 2022-2026 | Powered by Hexo 7.3.0 & Stellar 1.33.1
总访问量次 |